DIY Call Recognizers
A DIY Call Recognizer is a utility within Analysis Programs which allows you to write your own call recognizers.
A DIY call recognizer uses our generic recognizer tools. This guide will help you make your own generic recognizer. The generic recognizer allows a user to generically reuse and parametrize our syllable detectors. Once you can detect new syllables those syllables can be combined to form new call recognizers.
Note
- Incomplete parts of the manual are indicated by TODO.
- Features not yet implemented are marked with a construction emoji (🚧).
1. Why make a DIY call recognizer?
There are three levels of sophistication in automated call recognizers:
- The simplest is the handcrafted template.
- More powerful is a machine learned model.
- The current cutting edge of call recognizers is deep-learning using a convolutional neural network.
A comparison of these recognizer types is shown in the following table and explained further in the subsequent paragraph.
| Type of Recognizer | Who does the feature extraction? | Required dataset | Skill level | Accuracy |
|---|---|---|---|---|
| Template matching | User | Small (even 1!) | Least | Sometimes good |
| Supervised machine learning | User | Moderate (50-100s) | Some | Better |
| CNN | Part of CNN learning | Very large (10k to 1M) | A lot! | Best? |
Hand-crafted, rule-based templates can be built using just one or a few examples of the target call. But like any rule-based AI system, they are brittle, that is, they break easily if the target call falls even slightly outside the bounds of the rules.
A supervised machine-learning model, for example an SVM or Random Forest, is far more resilient to slight changes in the range of the target call but they require many more training examples, on the order of 100 training examples.
Finally, the convolutional neural network (CNN) is the most powerful learning machine available today (2021) but this power is achieved only by supplying thousands of examples of the each target call.
Tip
The following two rules apply to the preparation of training/test datasets, regardless of the recognizer type.
- Rule 1. Rubbish in ➡ rubbish out!
That is, think carefully about your chosen training/test examples. - Rule 2. Training and test sets should be representative (in some loose statistical sense) of the intended operational environment.
To summarize (and at the risk of over-simplification):
- a hand-crafted template has low cost and low benefit
- a machine-learned model has medium cost and medium benefit
- while a deep-learned model has high cost and high benefit
The cost/benefit ratio in each case is similar but here is the catch - the cost must be paid before you get the benefit! Furthermore, in a typical ecological study, a bird species is of interest precisely because it is threatened or cryptic. When not many calls are available, the more sophisticated approaches become untenable. Hence there is a place for hand-crafted templates in call recognition.
These ideas are summarized in the following table:
| Type of Recognizer | Cost | Benefit | Cost/benefit ratio | The catch ! |
|---|---|---|---|---|
| Template matching | Low | Low | A number | You must pay ... |
| Machine learning | Medium | Medium | A similar number | ... the cost before ... |
| CNN | High | High | A similar number | ... you get the benefit! |
To summarize, the advantages of a hand-crafted DIY call recognizer are:
- You can do it yourself!
- You can start with just one or two calls.
- Allows you to collect a larger dataset (and refine it) for machine learning purposes.
- Exposes the variability of the target call as you go.
2. Calls, syllables, harmonics
The algorithmic approach of DIY Call Recognizer makes particular assumptions about animals calls and how they are structured. A call is taken to be any sound of animal origin (whether for communication purposes or not) and include bird songs/calls, animal vocalizations of any kind, the stridulation of insects, the wingbeats of birds and bats and the various sounds produced by aquatic animals. Calls typically have temporal and spectral structure. For example they may consist of a temporal sequence of two or more syllables (with "gaps" in between) or a set of simultaneous harmonics or formants. (The distinction between harmonics and formants does not concern us here.)
3. Acoustic events
An acoustic event is defined as a contiguous set of spectrogram cells/pixels whose decibel values exceed some user defined threshold. In the ideal case, an acoustic event should encompass a discrete component of acoustic energy within a call, syllable or harmonic. It will be separated from other acoustic events by gaps having decibel values below the user defined threshold.
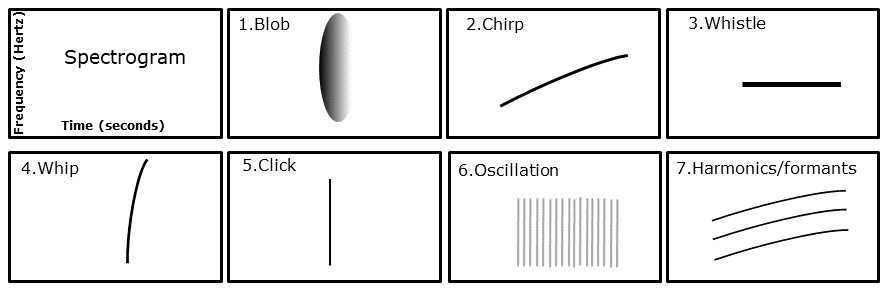
DIY Call Recognizer contains algorithms to recognize seven different kinds of generic acoustic events based on their shape in the spectrogram.
There are seven types of acoustic events:
- Shrieks: diffuse events treated as "blobs" of acoustic energy. A typical example is a parrot shriek.
- Whistles: "pure" tones (often imperfect) appearing as horizontal lines on a spectrogram.
- Chirps: whistle like events that increases in frequency over time. Appears like a sloping line in a spectrogram.
- Whips: sound like a "whip crack". They appear as steeply ascending or descending spectral track in the spectrogram.
- Clicks: appear as a single vertical line in a spectrogram and sounds, like the name suggests, as a very brief click.
- Oscillations: An oscillation is the same (or nearly the same) syllable (typically whips or clicks) repeated at a fixed periodicity over several to many time-frames.
- Harmonics: Harmonics are the same/similar shaped whistle or chirp repeated simultaneously at multiple intervals of frequency. Typically, the frequency intervals are similar as one ascends the stack of harmonics.
For more detail on event types see acoustic events.
4. Detecting acoustic events
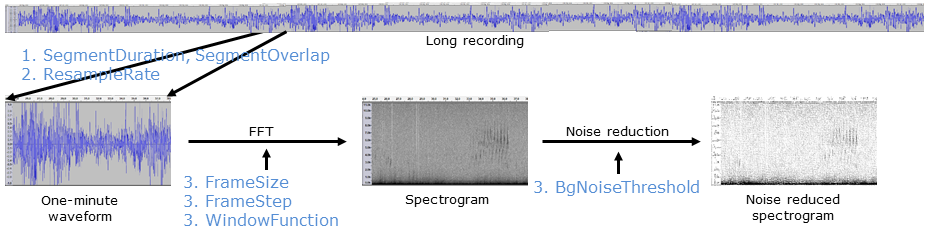
A DIY Call Recognizer attempts to recognize calls in a noise-reduced spectrogram using a sequence of steps:
Preprocessing—steps to prepare the recording for subsequent analysis.
- Input audio is broken up into 1-minute chunks
- Audio resampling
Processing—steps to identify target syllables as "generic" acoustic events
- Spectrogram preparation
- Call syllable detection
Postprocessing—steps which simplify the output combining related acoustic events and filtering events to remove false-positives
- Combining syllable events into calls
- Syllable/call filtering
Saving Results
To execute these detection steps, suitable parameter values must be placed into a configuration file.
5. Configuration files
All analyses in AP require a configuration file (henceforth, config file) in order to tune the analysis.
It is no different for a generic recognizer. To find calls of interest in a recording AP reads the config file which contains parameters and then executes the detection steps accordingly.
Important
If you're not familiar with AP's config files please review our Config Files page.
Naming
Configuration files must be named in a certain format. The basic format is:
<author>.<analysis>[.<tag>]*.yml
The author and analysis name sections are mandatory. The tag section is optional, ignored by AP, and can be repeated.
See Naming in the Config Files document for more details and examples.
Parameters
Config files contain a list of parameters, each of which is written as a name-value pair, for example:
ResampleRate: 22050
Changing these parameters allows for the construction of a generic recognizer. This guide will explain the various parameters than can be changed and their typical values. However, this guide will not produce a functional recognizer; each recognizer has to be "tuned" to the target syllables for species to be recognized. Only you can do that.
There are many parameters available. To make config files easier to read we order these parameters roughly in the order that they are applied. This aligns with the basic recognition steps from above.
- Parameters for preprocessing
- Parameters for processing
- Parameters for postprocessing
- Parameters for saving Results
Profiles
Profiles are a list of acoustic event detection algorithms to use in our processing stage.
Tip
For an introduction to profiles see the Config Files page.
Each algorithm is designed to detect a syllable type. Thus to make a generic recognizer there should be at least one (1) profile in the Profiles list.
A config file may target more than one syllable or acoustic event, in which case there will be a profile for each target syllable or acoustic event.
The Profiles list contains one or more profile items, and each profile has several parameters. So we have a three level hierarchy:
- The key-word
Profilesthat heads the list. - One or more profile declarations.
- There are two parts to each profile declaration:
- A user defined name
- And the algorithm type to use with this profile (prefixed with an exclamation mark (
!))
- There are two parts to each profile declaration:
- The profile parameters consisting of a list of name:value pairs
Here is an (abbreviated) example:
Profiles:
    BoobookSyllable1: !ForwardTrackParameters
        # min and max of the freq band to search
        MinHertz: 400
        MaxHertz: 1100
        # min and max time duration of call
        MinDuration: 0.1
        MaxDuration: 0.499
    BoobookSyllable2: !ForwardTrackParameters
        MinHertz: 400
        MaxHertz: 1100
        MinDuration: 0.5
        MaxDuration: 0.899
    BoobookSyllable3: !ForwardTrackParameters
        MinHertz: 400
        MaxHertz: 1100
        MinDuration: 0.9
        MaxDuration: 1.2
This artificial example illustrates three profiles (i.e. syllables or acoustic events) under the key word Profiles.
We can see one of the profiles has been given the name BoobookSyllable3 and has the type ForwardTrackParameters.
This means for the BoobookSyllable3 we want AP to use the forward track algorithm to look for a chirp.
Each profile in this example has four parameters. All three profiles have the same values for MinHertz and MaxHertz
but different values for their time duration. Each profile is processed separately by AP.
Algorithm types
In the above example, the line BoobookSyllable1: !ForwardTrackParameters is to be read as:
the name of the target syllable is BoobookSyllable1 and its type is ForwardTrackParameters
There are currently seven algorithm types, each designed to detect a different type of acoustic event. The names of the acoustic events describe what they sound like, whereas, the names of the algorithms (used to find those events) describe how the algorithms work.
This table lists the "generic" events, the algorithm used to detect the event, and the name of the parameter list needed by the algorithm.
| Acoustic Event | Algorithm name | Parameters name |
|---|---|---|
| Shriek | Blob |
!BlobParameters |
| Whistle | OnebinTrack |
!OnebinTrackParameters |
| Chirp | ForwardTrack |
!ForwardTrackParameters |
| Whip | UpwardTrack |
!UpwardTrackParameters |
| Click | VerticalTrack |
!OneframeTrackParameters |
| Oscillation | Oscillation |
!OscillationParameters |
| Harmonic | Harmonic |
!HarmonicParameters |
Each of these detection algorithms has some common parameters because all "generic" events are characterized by common properties, such as their minimum and maximum temporal duration, their minimum and maximum frequencies, and their decibel intensity. In fact, every acoustic event is bounded by an implicit rectangle or marquee whose height represents the bandwidth of the event and whose width represents the duration of the event.
Even a chirp or whip which consists only of a single sloping spectral track, is enclosed by a rectangle, two of whose vertices sit at the start and end of the track.
See CommonParameters for more details.
6. Config parameters and values
This section describes how to set the parameter values for each of the call-detection steps. We use, as a concrete example, the config file for the Boobook Owl, Ninox boobook.
The YAML lines are followed by an explanation of each parameter.
Audio segmentation and resampling
Analysis of long recordings is made tractable by breaking them into shorter (typically 60-second) segments. This is done with the Analyze Long Recordings command.
The first part of a generic recognizer config file is as follows:
# Resample rate must be 2 X the desired Nyquist
ResampleRate: 22050
# SegmentDuration: units=seconds;
SegmentDuration: 60
# SegmentOverlap: units=seconds;
SegmentOverlap: 0
These parameters control:
- the size of the segments into which the audio file is split for analysis
- the amount of overlap between consecutive segments
- the sample rate at which the analysis is performed (22050 Hz)
For more information on these parameters see the AnalyzerConfig page.
Segment size and and overlap have good defaults set and you should not need to change them. The best value for sample rate will be analysis dependent, but will default to 22050 Hertz if not provided.
Adding profiles
For each acoustic event you want to detect, you need to add a profile. Each profile uses one of the generic recognizer algorithms.
Common Parameters
# Each of these profiles will be analyzed
# This profile is required for the species-specific recogniser and must have the current name.
Profiles:
    BoobookSyllable: !ForwardTrackParameters
        SpeciesName: NinoxBoobook
The key parts here are:
- the profile name (
BoobookSyllable) - the algorithm type (
!ForwardTrackParameterswhich will detect a chirp) - and an optional species name (
NinoxBoobook)
Both the profile name and the species names can be any name you like. The names are stored in the results so you know what algorithm generated an event.
We could have a profile name of banana and species name of i_like_golf—but neither of these names are useful
because they are not descriptive.
All algorithms have some common parameters. These include
- Spectrogram settings
- Noise removal settings
- Parameters that set basic limits to the allowed duration and bandwidth of an event
Each algorithm has its own spectrogram settings, so parameters such as WindowSize can be varied for each type of
acoustic event you want to detect.
Common Parameters: Spectrogram preparation
By convention, we list the spectrogram parameters first (after the species name) in each algorithm entry:
# Each of these profiles will be analyzed
# This profile is required for the species-specific recogniser and must have the current name.
Profiles:
    BoobookSyllable: !ForwardTrackParameters
        SpeciesName: NinoxBoobook
        FrameSize: 1024
        FrameStep: 256
        WindowFunction: HANNING
        BgNoiseThreshold: 0.0
FrameSizesets the size of the FFT window.FrameStepsets the number of samples between frame starts.WindowFunctionsets the FFT window function.BgNoiseThresholdsets the degree of background noise removal.
Since these parameters are so important for the success of call detection, you are strongly advised to refer to the Spectrograms document for more information about setting their values.
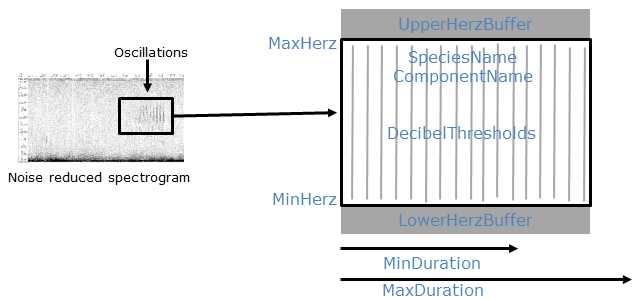
Common Parameters: Call syllable limits
A complete definition of the BoobookSyllable follows.
# Each of these profiles will be analyzed
# This profile is required for the species-specific recogniser and must have the current name.
Profiles:
    BoobookSyllable: !ForwardTrackParameters
        SpeciesName: NinoxBoobook
        FrameSize: 1024
        FrameStep: 256
        WindowFunction: HANNING
        BgNoiseThreshold: 0.0

        # min and max of the freq band to search
        MinHertz: 400
        MaxHertz: 1100
        MinDuration: 0.17
        MaxDuration: 1.2
        # Scan the frequency band at these thresholds
        DecibelThresholds:
            - 6.0
            - 9.0
            - 12.0
The additional parameters direct the actual search for target syllables in the spectrogram.
MinHertzandMaxHertzset the frequency band in which to search for the target event. Note that these parameters define the bounds of the search band, not the bounds of the event itself. These limits are hard bounds.MinDurationandMaxDurationset the minimum and maximum time duration (in seconds) of the target event. These limits are hard bounds.
Adding profiles with algorithms
For brevity, we've broken up the descriptions of each algorithm to their own pages. Some of these algorithms have extra parameters, some do not, but all do have the common parameters we've previously described.
| I want to find a | I'll use this algorithm |
|---|---|
| Shriek | !BlobParameters |
| Whistle | 🚧 !OnebinTrackAlgorithm 🚧 |
| Chirp | !ForwardTrackParameters |
| Whip | 🚧!UpwardTrackParameters 🚧 |
| Click | 🚧 !OneframeTrackParameters 🚧 |
| Oscillation | !OscillationParameters |
| Harmonic | !HarmonicParameters |
Post Processing
The post processing stage is run after event detection (the Profiles section).
Add a post processing section to you config file by adding the PostProcessing parameter and indenting the sub-parameters.
PostProcessing:
Post processing is optional - you may decide to combine or filter the "raw" events using code you have written yourself.
Note
If you do not wish to include a post-processing step, disable it by deleting its keyword and all component parameters.
Alternatively, you can comment out the relevant lines by inserting a # at the start of each line.
Disabling a post-processing filter means that all events are accepted (not filtered out) for that step.
Order of operation
There are six post-processing steps, each of which is optional. However the order in which these steps are performed cannot be changed by the user. The post-processing sequence is:
- Combine events having temporal and spectral overlap.
- Combine possible sequences of events that constitute a "call".
- Remove (filter) events whose duration is outside an acceptable range.
- Remove (filter) events whose bandwidth is outside an acceptable range.
- Remove (filter) events having excessive acoustic activity in their sidebands.
- Remove (filter) events that are enclosed by another event.
Post-processing steps 1 through 5 are performed once for each of the DecibelThresholds used in the event detection stage.
Post-processing step 6 is performed on all the events emerging from all rounds of post-processing steps 1-5.
Combine events having temporal and spectral overlap
PostProcessing:
    # The following generic post-processing steps are determined by config settings.
    # Step 1: Combine overlapping events - events derived from all profiles.
    # Step 2: Combine possible syllable sequences and filter on excess syllable count.
    # Step 3: Remove events whose duration is too small or large.
    # Step 4: Remove events whose bandwidth is too small or large.
    # Step 5: Remove events that have excessive noise in their side-bands.

    # 1: Combine overlapping events
The CombineOverlappingEvents parameter is typically set to true, but it depends on the target call. You would typically set this to true for two reasons:
- the target call is composed of two or more overlapping syllables that you want to join as one event.
- whistle events often require this step to unite whistle fragment detections into one event.
Combine possible sequences of events that constitute a "call"
Unlike overlapping events, if you want to combine a group of events (like syllables) that are near each other but not
overlapping, then make use of the SyllableSequence parameter. A typical example would be to join a sequence of chirps
in a honeyeater call.
PostProcessing:
    # The following generic post-processing steps are determined by config settings.
    # Step 1: Combine overlapping events - events derived from all profiles.
    # Step 2: Combine possible syllable sequences and filter on excess syllable count.
    # Step 3: Remove events whose duration is too small or large.
    # Step 4: Remove events whose bandwidth is too small or large.
    # Step 5: Remove events that have excessive noise in their side-bands.

    # 1: Combine overlapping events
    CombineOverlappingEvents: true

    # 2: Combine possible syllable sequences
    SyllableSequence:
        SyllableStartDifference: 0.6
        SyllableHertzGap: 350
        FilterSyllableSequence: true
        SyllableMaxCount: 2
        ExpectedPeriod: 0.4
SyllableStartDifference and SyllableHertzGap set the allowed tolerances when combining events into sequences
SyllableStartDifferencesets the maximum allowed time difference (in seconds) between the starts of two events.SyllableHertzGapsets the maximum allowed frequency difference (in Hertz) between the minimum frequencies of two events.
Once you have combined possible sequences, you may wish to remove sequences that do not satisfy the periodicity
constraints for your target call, that is, the maximum number of syllables permitted in a sequence and the average time
gap between syllables. To enable filtering on syllable periodicity, set FilterSyllableSequence to true and assign
values to SyllableMaxCount and ExpectedPeriod.
SyllableMaxCountsets an upper limit on the number of events that constitute an allowed sequence.ExpectedPeriodsets an expectation value for the average period (in seconds) of an allowed combination of events.
Note
The properties ExpectedPeriod and SyllableStartDifference interact.
Refer to the following documentation for more information: EventPostProcessing.SyllableSequenceConfig.
Remove events whose duration is outside an acceptable range
PostProcessing:
    # The following generic post-processing steps are determined by config settings.
    # Step 1: Combine overlapping events - events derived from all profiles.
    # Step 2: Combine possible syllable sequences and filter on excess syllable count.
    # Step 3: Remove events whose duration is too small or large.
    # Step 4: Remove events whose bandwidth is too small or large.
    # Step 5: Remove events that have excessive noise in their side-bands.

    # 1: Combine overlapping events
    CombineOverlappingEvents: true

    # 2: Combine possible syllable sequences
    SyllableSequence:
        SyllableStartDifference: 0.6
        SyllableHertzGap: 350
        FilterSyllableSequence: true
        SyllableMaxCount: 2
        ExpectedPeriod: 0.4

    # 3: Remove events whose duration lies outside 3 SDs of an expected value.
    #Duration:
    #    ExpectedDuration: 0.14
    #    DurationStandardDeviation: 0.01

    # 4: Remove events whose bandwidth lies outside 3 SDs of an expected value.
    Bandwidth:
        ExpectedBandwidth: 280
        BandwidthStandardDeviation: 40
Use the parameter Duration to filter out events that are too long or short. There are two parameters:
ExpectedDurationdefines the expected or average duration (in seconds) for the target events.DurationStandardDeviationdefines one SD of the assumed distribution.
Refer to the following documentation for more information: EventPostProcessing.DurationConfig.
Remove events whose bandwidth is outside an acceptable range
Use the parameter Bandwidth to filter out events whose bandwidth is too small or large. There are two parameters:
ExpectedBandwidthdefines the expected or average bandwidth (in Hertz) for the target events.BandwidthStandardDeviationdefines one SD of the assumed distribution.
Refer to the following documentation for more information: EventPostProcessing.BandwidthConfig.
Remove events that have excessive noise or acoustic activity in their side-bands
PostProcessing:
    # The following generic post-processing steps are determined by config settings.
    # Step 1: Combine overlapping events - events derived from all profiles.
    # Step 2: Combine possible syllable sequences and filter on excess syllable count.
    # Step 3: Remove events whose duration is too small or large.
    # Step 4: Remove events whose bandwidth is too small or large.
    # Step 5: Remove events that have excessive noise in their side-bands.

    # 1: Combine overlapping events
    CombineOverlappingEvents: true

    # 2: Combine possible syllable sequences
    SyllableSequence:
        SyllableStartDifference: 0.6
        SyllableHertzGap: 350
        FilterSyllableSequence: true
        SyllableMaxCount: 2
        ExpectedPeriod: 0.4

    # 3: Remove events whose duration lies outside 3 SDs of an expected value.
    #Duration:
    #    ExpectedDuration: 0.14
    #    DurationStandardDeviation: 0.01

    # 4: Remove events whose bandwidth lies outside 3 SDs of an expected value.
    Bandwidth:
        ExpectedBandwidth: 280
        BandwidthStandardDeviation: 40

    # 5: Filter the events for excess activity in their sidebands
    SidebandAcousticActivity:
        LowerSidebandWidth: 150
        #UpperSidebandWidth: 200
        MaxBackgroundDecibels: 12
        #MaxActivityDecibels: 12
The intuition of this filter is that an unambiguous event (representing a call or syllable) should have an "acoustic-free zone" above and below it. This filter removes an event that has "excessive" acoustic activity spilling into its sidebands. Such events are likely to be broadband events unrelated to the target event. Since this is a common occurrence, a sideband filter is useful.
For details on configuring this step see EventPostProcessing.PostProcessingConfig.
Remove events that are enclosed by other events
Running profiles with multiple decibel thresholds can produce sets of enclosed (wholly overlapped by another event) events
that are actually the result of detecting the same acoustic syllable.
This final (optional) post-processing step is to
remove all but the outermost event of any nested set. Enable this option by setting the parameter RemoveEnclosedEvents to true.
You would typically do this only after reviewing the output spectrograms to confirm that you have sets of overlapping events.
PostProcessing:
    # The following generic post-processing steps are determined by config settings.
    # Step 1: Combine overlapping events - events derived from all profiles.
    # Step 2: Combine possible syllable sequences and filter on excess syllable count.
    # Step 3: Remove events whose duration is too small or large.
    # Step 4: Remove events whose bandwidth is too small or large.
    # Step 5: Remove events that have excessive noise in their side-bands.

    # 1: Combine overlapping events
    CombineOverlappingEvents: true

    # 2: Combine possible syllable sequences
    SyllableSequence:
        SyllableStartDifference: 0.6
        SyllableHertzGap: 350
        FilterSyllableSequence: true
        SyllableMaxCount: 2
        ExpectedPeriod: 0.4

    # 3: Remove events whose duration lies outside 3 SDs of an expected value.
    #Duration:
    #    ExpectedDuration: 0.14
    #    DurationStandardDeviation: 0.01

    # 4: Remove events whose bandwidth lies outside 3 SDs of an expected value.
    Bandwidth:
        ExpectedBandwidth: 280
        BandwidthStandardDeviation: 40

    # 5: Filter the events for excess activity in their sidebands
    SidebandAcousticActivity:
        LowerSidebandWidth: 150
        #UpperSidebandWidth: 200
        MaxBackgroundDecibels: 12
        #MaxActivityDecibels: 12

    # 6: In the case of sets of nested/enclosed events,
    # filter/remove all but the outermost event.
    RemoveEnclosedEvents: true
Parameters for saving results
The parameters in this final part of the config file determine what results are saved to file.
# Options to save results files
# Available options for saving spectrograms: [Never | Always | WhenEventsDetected]
# "Always" can be useful when debugging but "WhenEventsDetected" is a good default.
SaveSonogramImages: WhenEventsDetected

# Available options for saving data files: [Never | Always | WhenEventsDetected]
SaveIntermediateWavFiles: Never
Each of the parameters controls whether extra diagnostic files are saved while doing an analysis.
Important
If you are doing a lot of analysis you'll want to disable this extra diagnostic output. It will produce files that are in total larger than the input audio data—you will fill your harddrive quickly!
SaveSonogramImageswill save a spectrogram for each analysed segment (typically one-minute)SaveIntermediateWavFileswill save the converted WAVE file used to analyze each segment
Both parameters accept three values:
Never: disables the output.WhenEventsDetected: only outputs the spectrogram/WAVE file when an event is found in the current segment. This choice is the most useful for debugging a new recognizer.Always: always save the diagnostic files. Don't use this option if you're going to analyze a lot of files
The completed example
Here is a the completed config file for the hypothetical boobook recognizer we have been working with:
---
# This is a non-functional example used for documentation. Please see the real config file for the Boobook recognizer.
# Boobook Owl = Towsey.NinoxBoobook
# Resample rate must be 2 X the desired Nyquist
ResampleRate: 22050
# SegmentDuration: units=seconds;
SegmentDuration: 60
# SegmentOverlap: units=seconds;
SegmentOverlap: 0

# Each of these profiles will be analyzed
# This profile is required for the species-specific recogniser and must have the current name.
Profiles:
    BoobookSyllable: !ForwardTrackParameters
        SpeciesName: NinoxBoobook
        FrameSize: 1024
        FrameStep: 256
        WindowFunction: HANNING
        BgNoiseThreshold: 0.0

        # min and max of the freq band to search
        MinHertz: 400
        MaxHertz: 1100
        MinDuration: 0.17
        MaxDuration: 1.2
        # Scan the frequency band at these thresholds
        DecibelThresholds:
            - 6.0
            - 9.0
            - 12.0

#################### POST-PROCESSING of EVENTS ###################

PostProcessing:
    # The following generic post-processing steps are determined by config settings.
    # Step 1: Combine overlapping events - events derived from all profiles.
    # Step 2: Combine possible syllable sequences and filter on excess syllable count.
    # Step 3: Remove events whose duration is too small or large.
    # Step 4: Remove events whose bandwidth is too small or large.
    # Step 5: Remove events that have excessive noise in their side-bands.

    # 1: Combine overlapping events
    CombineOverlappingEvents: true

    # 2: Combine possible syllable sequences
    SyllableSequence:
        SyllableStartDifference: 0.6
        SyllableHertzGap: 350
        FilterSyllableSequence: true
        SyllableMaxCount: 2
        ExpectedPeriod: 0.4

    # 3: Remove events whose duration lies outside 3 SDs of an expected value.
    #Duration:
    #    ExpectedDuration: 0.14
    #    DurationStandardDeviation: 0.01

    # 4: Remove events whose bandwidth lies outside 3 SDs of an expected value.
    Bandwidth:
        ExpectedBandwidth: 280
        BandwidthStandardDeviation: 40

    # 5: Filter the events for excess activity in their sidebands
    SidebandAcousticActivity:
        LowerSidebandWidth: 150
        #UpperSidebandWidth: 200
        MaxBackgroundDecibels: 12
        #MaxActivityDecibels: 12

    # 6: In the case of sets of nested/enclosed events,
    # filter/remove all but the outermost event.
    RemoveEnclosedEvents: true

# Options to save results files
# Available options for saving spectrograms: [Never | Always | WhenEventsDetected]
# "Always" can be useful when debugging but "WhenEventsDetected" is a good default.
SaveSonogramImages: WhenEventsDetected

# Available options for saving data files: [Never | Always | WhenEventsDetected]
SaveIntermediateWavFiles: Never

...
7. An efficient strategy to tune parameters
Tuning parameter values can be frustrating and time-consuming if a logical sequence is not followed. The idea is to tune parameters in the sequence in which they appear in the config file, keeping all "downstream" parameters as "open" or "unrestrictive" as possible. Here is a suggested tuning strategy:
- Turn off all post-processing steps. That is, comment out all post-processing keywords/parameters.
- Initially set all profile parameters so as to catch the maximum possible number of target calls/syllables.
- Set the array of decibel thresholds to cover the expected range of call amplitudes from minimum to maximum decibels.
- Set the minimum and maximum duration values to catch every target call by a wide margin. At this stage, do not worry that you are also catching a lot of false-positive events.
- Set the minimum and maximum frequency bounds to catch every target call by a wide margin. Once again, do not worry that you are also catching a lot of false-positive events.
- Set other parameters to their least "restrictive" values in order to catch maximum possible target events.
At this point you should have "captured" all the target calls/syllables (i.e. there should be minimal false-negatives), but you are likely to have many false-positives.
- Gradually constrain the parameter bounds (i.e. increase minimum values and decrease maximum values) until you start to lose obvious target calls/syllables. Then back off so that once again you just capture all the target events—but you will still have several to many false-positives.
- Event combining: You are now ready to set parameters that determine the post-processing of events. The first post-processing steps combine events that are likely to be syllables that are part of the same call.
- Event Filtering: Now add in the event filters in the same sequence as they appear in the config file.
This sequence cannot currently be changed because it is determined by the underlying code. There are event filters for duration, bandwidth, periodicity of component syllables within a call and finally acoustic activity in the sidebands of an event.
- Set the
periodicityparameters for filtering events based on syllable sequences. - Set the
durationparameters for filtering events on their time duration. - Set the
bandwidthparameters for filtering events on their bandwidth. - Set the
SidebandAcousticActivityparameters for filtering based on sideband acoustic activity.
- Set the
Note
You are unlikely to want to use all filters. Some may be irrelevant to your target call.
At the end of this process, you are likely to have a mixture of true-positives, false-positives and false-negatives. The goal is to set the parameter values so that the combined FP+FN total is minimized. You should adjust parameter values so that the final FN/FP ratio reflects the relative costs of FN and FP errors. For example, lowering a decibel threshold may pick up more TPs but almost certainly at the cost of more FPs.
Note
A working DIY Call Recognizer can be built with just one example or training call. A machine learning algorithm typically requires 100 true and false examples. The price that you (the ecologist) pays for this simplicity is the need to exercise some of the "intelligence" that would otherwise be exercised by the machine learning algorithm. That is, you must select calls and set parameter values that reflect the variability of the target calls and the relative costs of FN and FP errors.
8. Eight steps to building a DIY Call Recognizer
We described above the steps required to tune parameter values in a recognizer config file. We now step back from this detail and take an overview of all the steps required to obtain an operational recognizer for one or more target calls.
- Select one or more one-minute recordings that contain typical examples of your target call. It is also desirable that the background acoustic events in your chosen recordings are representative of the intended operational environment. If this is difficult, one trick to try is to play examples of your target call through a loud speaker in a location that is similar to your intended operational environment. You can then record these calls using your intended Acoustic Recording Unit (ARU).
- Assign parameter values into your config.yml file for the target call(s).
- Run the recognizer, using the command line described in the next section.
- Review the detection accuracy and try to determine reasons for FP and FN detections.
- Tune or refine parameter values in order to increase the detection accuracy.
- Repeat steps 3, 4 and 5 until you appear to have achieved the best possible accuracy. In order to minimize the number of iterations of stages 3 to 5, it is best to tune the configuration parameters in the sequence described in the previous section.
- At this point you should have a recognizer that performs "as accurately as possible" on your training examples. The next step is to test your recognizer on one or a few examples that it has not seen before. That is, repeat steps 3, 4, 5 and 6 adding in a new example each time as they become available. It is also useful at this stage to accumulate a set of recordings that do not contain the target call. See Section 10 for more suggestions on building datasets.
- At some point you are ready to use your recognizer on recordings obtained from the operational environment.
9. Running a generic recognizer
AP performs several functions. Each function is selected by altering the command used to run AP.
For running a generic recognizer we need to to use the audio2csv command.
- For an introduction to running commands see Running commands
- For detailed help on the audio2csv command see Analyze Long Recordings
The basic form of the command line is:
AnalysisPrograms.exe audio2csv <input_file> <config_file> <output_folder> --analysis-identifier "Ecosounds.GenericRecognizer"
When you run the command, swap out <input_file>, <config_file>, and <output_folder> for the actual paths to your audio,
your config file, and your desired output folder respectively.
For example, if the files birds.wav and NinoxBoobook.yml were in the current folder and you want to save output to the folder /BoobookResults, one could run:
AnalysisPrograms.exe audio2csv birds.wav NinoxBoobook.yml BoobookResults --analysis-identifier "Ecosounds.GenericRecognizer"
Note
The analysis-identifier (--analysis-identifier followed by the "Ecosounds.GenericRecognizer") is required for
generic recognizers. Using --analysis-identifier informs AP that this is generic recognition task and enables it to perform the correct analysis.
If you want to run your generic recognizer more than once, you might want to use powershell or R to script AP.
10. Building a larger data set
As indicated above, it is useful to accumulate a set of recordings, some of which contain the target call and some of which do not. The negative examples should include acoustic events that have previously been detected as FPs.
You now have two sets of recordings, one set containing the target call(s) and one set containing previous FPs and other possibly confusing acoustic events. The idea is to tune parameter values, while carefully watching for what effect the changes have on both data sets.
Eventually, these two labelled data sets can be used for
- validating the efficacy of your recognizer
- or for machine learning purposes.
Egret is software designed to assess large datasets for recognizer performance, in an automated fashion. Egret can greatly speed up the development of a recognizer because it is easier to repeatedly test small changes to your recognizer parameters.
Egret is available from https://github.com/QutEcoacoustics/egret.